Fess offers three types of packages: ZIP/RPM/DEB.
The RPM/DEB packages are for Red Hat and Ubuntu respectively, and the standard Elasticsearch RPM/DEB packages corresponding to them are installed and used. The ZIP package is easy to use on any OS and is distributed with Elasticsearch built in.
You can easily create a Fess environment by expanding the ZIP package file, but when using it in production operation, we do not recommend running it with embedded Elasticsearch. Like RPM/DEB package, you need to build and use Elasticsearch separately from Fess.
This time, we will explain the construction assuming production operation in a Windows environment.
Java installation
As with other operating systems, Java is required to start Fess. Please install Java 8u131 or later.
After installing Java, set the environment variables as follows.
1. Select Control Panel> System and Security> System> Advanced system settings> Environment variables. 1. Click “New” of “System environment variable”. 1. Enter “JAVA_HOME” in “Variable name” and the address of the JDK file in “Variable value” and press “OK”. The JDK file is usually located in “ C:Program Filejavajdk1.8.0_XXX” (XXX is the java version).  1. In System Variables, select Path and click Edit. 1. In Edit Environment Variable Name, click New %JAVA_HOME%bin, type in and click OK.
Install Elasticsearch
The version of Elasticsearch depends on the version of Fess used. Please read and install as appropriate.
You can check the Elasticsearch version corresponding to your Fess on the Fess download page. This time I use Fess 12.3.5, so download Elasticsearch 6.4.3.
Download the Windows version from the Elasticsearch download page. and unzip it. This time I will c:optdeploy it to.
Install plugin
Enter the following command at the command prompt to install the required plugins.
Please install the plugin corresponding to the version of Elasticsearch to be installed.
The plugin to install also depends on the Elasticsearch version, so please refer to the Fess installation guide to install the correct version.
Configuration
In order to save the dictionary file distributed from Fess on Elasticsearch elasticsearchconfigelasticsearch.yml, add the following settings to.
Registration to Windows service
Register the Elasticsearch service with the Windows service. Start the command prompt with administrator privileges and execute the following command.
Install Fess
You can get the Fess ZIP file from the download page .
This time I use Fess 12.3.5. I c:optwill deploy it here as well .
Configuration
fessbinfess.in.batModify to access Elasticsearch as follows.
Specify the port number for connecting with Elasticsearch. fessappWEB-INFclassesfess_config.properties To change.
The default port number on the Fess search screen and management screen is 8080. If you c:optfessbinfess.in.batwant to change to 80, change fess.port of.
Registration to Windows service
Register the Fess service as a Windows service. Start the command prompt with administrator privileges and execute the following command.
Service startup
If you want to start the service manually, start the Elasticsearch service first, and then start the Fess service.
Run the following command to start Elasticsearch.
Start Fess.
Service auto-start settings
If you want to start the service automatically when Windows starts, set as follows.
1. Open Control Panel> System and Security> Administrative Tools> Services. 1. Open the properties of “elasticsearch 6.4.2 (elasticsearch-service-x64)” from the service list and set “Startup type” to “Automatic” and click “OK”. 1. Open the property of “Fess (fess-service-x64)” from the service list, set “Startup type” to “Automatic (delayed start)” and click “OK”. 1. Press “R” key while pressing “Windows” key on the keyboard to display “Run”. After entering “regedit”, click “OK” to open the registry editor. 1. “COMPUTERHKEY_LOCAL_MACHINESYSTEMCurrentControlSetServicesfess-service-x64DependOnServiceAdd” elasticsearch-service-x64 “to the value of the” click “OK”.  1. Once added, elasticsearch-service-x64 appears in the Fess service properties dependency.
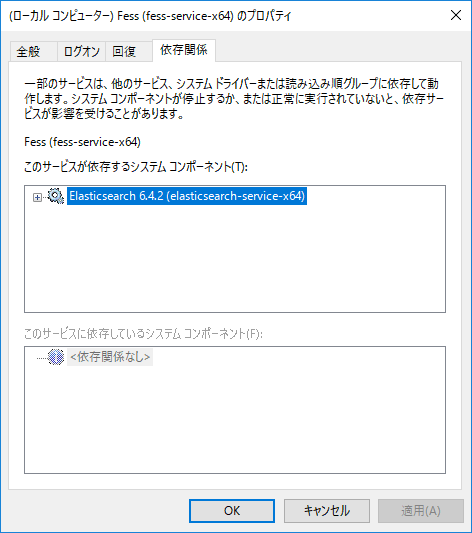
Stop service
When stopping the service, the Fess service is stopped first, and then the Elasticsearch service is stopped.
Execute the following command to stop Fess.
Stop Elasticsearch.
Summary
This time, we introduced how to build Fess in a Windows environment assuming production operation. Please refer to it when building Fess in Windows environment.